
Guides related to Beach
Set up redirects for public assets
Redirects on persistent resources do not work in Beach – but there's a workaround for that.
When using the Neos Redirect Handler in Beach, you will eventually notice it doesn't work for public assets (persistent resources). You will then realize the most common mistake (forgetting to adjust the webserver configuration) is something you can't do in Beach – and it would not help, anyway…
But the reason a resource redirect does not work in Beach is caused by something very similar to what the documentation says:
For the redirect handler to even see the request, this has to be removed.
The difference lies in what this is in Beach: Any request to a perisstent resource URL is internally passed on to Google Cloud Storage. And if a resource is not there (anymore), we can't back out and let Flow handle the request (for the Redirect Handler to take care.)
Redirects, hacker style
But there is a way to work around that by creating the redirect in Google Cloud Storage directly, using a somewhat funny workaround…
Create a redirect HTML file
By creating a file with the right name and setting it's content type to text/html we can place an HTML file containing an http-equiv redirect in the cloud storage, telling the client browser to follow the redirect.
- Find the two URLs involved (source and target from now on)
- From the source URL extract just the SHA1 and use it as the file name for the next step
- Create a file with this content:
<!DOCTYPE html>
<html>
   <head>
      <title>Redirected resource</title>
      <meta http-equiv="refresh" content="0; url=[target]"/>
   </head>
   <body>
      <p><a href="[target]">The file has been moved to [target]</a></p>
   </body>
</html>
Make sure to replace [target] in the HTML (lines 5 & 8) with the correct URL. Feel free to adjust the title in line 4, but that's probably something never seen by anyone…
Now comes the hard part: You need to upload that file to the cloud storage bucket and set the content type.
Prepare access to Google Cloud Storage
One way would be using the web-based UI Google provides, but since you do not have access to the storage buckets Beach uses from there, it can't be used. The other way is to use gsutil from the command line. If you already have that installed (try gsutil help), great. If not, you need to "install" it by downloading the standalone gsutil archive and unpacking it. Then you should be able to run gsutil help from the folder you just unpacked.
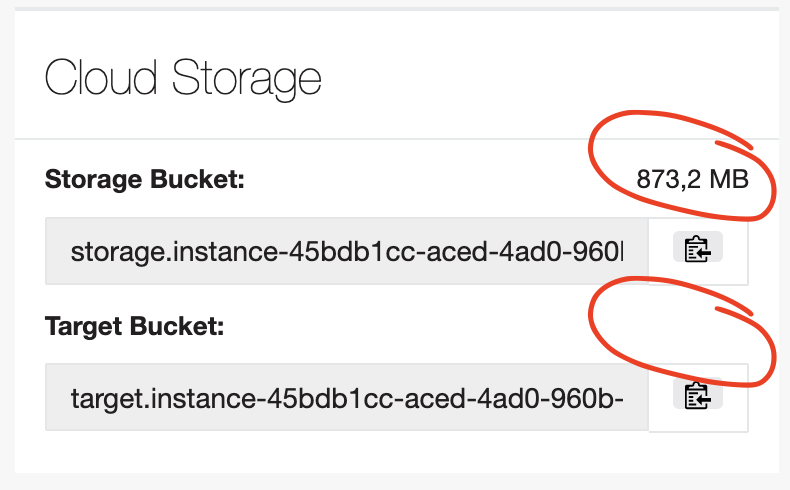
Next up is fetching the credentials as well as the bucket you need to store the file in. Log in to Beach and check the settings of your instance. If you have data stored in both buckets, use the target bucket, if you have only data in the storage bucket, use that one. In this example, the storage bucket is the one to choose, use the value as [bucket] later on:
To get the credentials, log in to your instance via SSH and get the key file content by running this:
echo $BEACH_GOOGLE_CLOUD_STORAGE_SERVICE_ACCOUNT_PRIVATE_KEY | base64 -d
Store the output in a file named e.g. gcs-key.json and make sure it is kept safe! Never make it available publicly and remove it when you no longer need it. Now tell gsutil to use your credentials file by running gsutil config -e and answering the questions it asks you:
$ gsutil/gsutil config -e
This command will create a boto config file at /home/…/.boto
containing your credentials, based on your responses to the following
questions.
What is the full path to your private key file? /home/…/gcs-key.json

Please navigate your browser to https://cloud.google.com/console#/project,
then find the project you will use, and copy the Project ID string from the
second column. Older projects do not have Project ID strings. For such projects,
 click the project and then copy the Project Number listed under that project.

What is your project-id? flownative-beach

gsutil developers rely on user feedback to make improvements to the
tool. Would you like to send anonymous usage statistics to help
improve gsutil? [y/N]

Boto config file "/home/…/.boto" created. If you need to use a
proxy to access the Internet please see the instructions in that file.
In line 5 use the path to the key file you created earlier. In case your key file is readable by others, the tool will now ask you to fix this, let it do the work. Now ignore line 7 and use flownative-beach as answer in line 12.
Upload the redirect file to the cloud storage
Now you can finally upload the HTML file you prepared and set it's content type:
$ gsutil cp [source hash] gs://[bucket]/[source hash]
$ gsutil setmeta -h "Content-Type:text/html" gs://[bucket]/[source hash]
Make sure to not use any file extension for the uploaded file. Now you should be able to call the full source URL in a browser and should be redirected to the target URL. Possibly you see the browser briefly flash an HTML page with the link to your target, but usually that's not even noticeable.
Title photo by Sean Foster on Unsplash